Tuesday, 31 January 2012

Versatile Blogger Award


What's this? - Anne from marmalade and catmint has nominated me for the Versatile Blogger Award. Quick, look it upon Google. I can't seem to find the origin of this award. Looks like it's a 'does the rounds and spreads' kind of award. Lovely to be nominated, thank you Anne and in order to 'pass it on' I have to look at the rules.

Rules
1. Thank the person who gave you this award. (done)
2. Include a link to their blog. (done)
3. Select 15 blogs/bloggers that you've recently discovered or follow regularly and nominate them for this award.
(Gosh, this one's difficult. Every blog I follow is an excellent read. Give me time for this one.)
4. Finally tell the person who nominated you 7 things about yourself. (Right, thinking cap on again.)

Seeing as this is a 'Versatile' award I shall try to think of bloggers who can be described with this adjective.

adjective
1. capable of or adapted for turning easily from one to another of various tasks, fields of endeavour, etc.: a versatile writer.
2. having or capable of many uses: a versatile tool.
3. Botany. attached at or near the middle so as to swing freely, as an anther.
4. Zoology. turning either forward or backward: a versatile toe.
5. variable or changeable, as in feeling, purpose, or policy: versatile moods.

So here's the first list with one observation of the blogger's versatility.

1. A Blessed Life - This lady can turn her work into an enjoyable outing with her family. A very loving lady.
2. Land of the Big Sky - This lady can turn her love of art into a practical and enjoyable experience for children. A very observant lady.
3. Frugal Living UK - This gentleman can turn a run down house into a home. A man with a plan.*
4. Unbought Delicacies - This lady can turn wool into wonderful creations. A thoughtful and talented lady.
5. The Smiths on Tour - This couple have decided to eliminate all fats, oils and processed foods from their diet. Wow!
6. Hardup Hester - This lady can juggle life, work and family with humour and love. In her words 'my life lurches from calm to chaotic'. Brilliant.
7. Meanqueen This lady is capable of 'many uses' - walking dogs, looking after cats, caring for the community, juggling finances. Capable and Caring - wonderful lady.
8. Oh, I give up now - every blog on my list and every follower following me has a person who is versatile behind it. I hearby award you all with the Versatile Blogger Award. Please feel free to pass it on and list some blogs of your own choosing showcasing the versatility of the blogger.

Now for the second list - 7 (versatile) facts about me. I think I'll tell everyone, not just Anne.

1. I can put my right foot round the back of my head.
2. I can swing one arm by my side in a clockwise direction whilst swinging the other in an anti-clockwise direction and then change directions without stopping.
3. My second toe is longer than my big toe.
4. I can recite the alphabet backwards.
5. 


(Pity I didn't check my punctuation.)

6. I can breathe in deeply and then hum continuously for 30 seconds.
7. I can touch the end of my nose with the tip of my tongue.

Now own up, how many of you have just:-
- contorted your arm or leg
- taken off your socks and inspected your feet
- pictured the alphabet in your head
- read through the note on the picture again
- picked up a pencil and paper
- hummed to no-one in particular
- and wiped spit off your top lip?

*One last thing (she says going off at a tangent) here is a very long palindrome.

amanaplanacanalpanama


Monday, 30 January 2012

Decisions, Decisions

Plan A

I wanted it to be chaotic, random, asymmetric, higgledy piggledy with different shapes going off at a tangent (in fact no planned layout at all) but it didn't want to do that.


I wanted it to be organic with one shape growing out of another being unpredictable but it didn't want to do that.

Plan B

 It wanted to line itself up ...


... and be organised.


Note to self:- I want - doesn't get.

Plan C

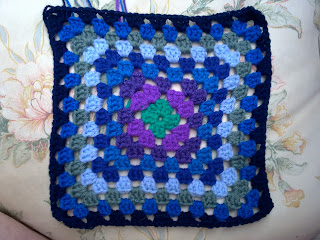
We decided on a compromise. It felt happy in small units so I'm making 4 large blocks with the centre corner missing. There will be a centre block in the middle. The shapes will put themselves together for 4 of the blocks and I shall try to have one 'alternative' block (Plan A) showing my original intention of random, organic design.


That's the plan so far - I'm rapidly running out of wool so new colours are being added. 

I feel a Plan D coming along!

Welcome to my New Follower - it's good to hear from you. I hope you enjoy your visits.

Sunday, 29 January 2012

Follow Me

Greetings New Follower. It was one of my New Year Resolutions to visit all my followers (those who had accessible blogs). I've managed that and I aim to 'go round again' and leave comments. I love to receive comments and I'm sure you do aswell. I started this blog just for me and it really is still 'just for me' but it's lovely to know that other people share my interests and hobbies and identify with different aspects of my life. Thank you, everyone who takes the time to read my drivel and give positive feedback on my actions. You make me smile and laugh and give me so much in return when I read your comments and blogs. Here's to friends in the Blogosphere! Long may our interaction continue.

Saturday, 28 January 2012

Oh Dear

Dressing table drawer ...


... not a pretty sight! 

*some small change (destined for the sealed pot)
*emery boards
*hairdressing scissors
*brushes and combs
*lipstick
*weaving needle
*old Ladyshave
*little bit of pot pourri
*sticky ikkies
*sprays, pills and creams
*bracelet
*music 'bones'
*bag of jewelry bits
*small trinket boxes
*drawing pins
*necklaces
*prescription papers

and a partridge in a pear tree! (nope)


and a cuddly toy! (nope)


and rather a mess! (yep)


Thursday, 26 January 2012

Keeping Fit List

Tea dancing with 2 colleagues,
Zumba-ing with a friend,
walking by myself,
possibly swimming with another friend,
dancing at home,
soon to be gardening again,
eating healthily (nearly),
whizzing round the housework

and washing the kitchen floor on my hands and knees.

That might do it.


Wednesday, 25 January 2012

Mum's Granny Along 5

Now we're rolling. You should be up and running after this (hopefully)!

Lesson No. 5 - Joining a Different Colour and Working a Round

Items needed - one ball of wool and a crochet hook.
Skill needed - to be able to chain, controlling the hook, the wool and the work confidently. If you are not confident using the hook yet do practise just chaining until you are not fighting with holding the wool and the hook.

Remember these abbrieviations?

ch - chain
st - stitch
sl st - slip stitch
tr - treble
yo - yarn over
cl - cluster

Good. Here are the instructions up to the end of Lesson 4.

Begin with a slip knot and ch 3.
Join with a sl st to form a ring.
Ch 3 (this was the 'pretend' first treble), 2 tr, ch 2 (first corner)
3 tr, ch 2 (second corner)
3 tr, ch 2 (third corner)
3tr, ch2 then sl st to first cl 
Fasten off.

There are different ways of joining the next colour. This is what I do.

Put the hook through a corner space (I've gone through the space where I left off in the first round) and hook the second colour.


Bring the colour through the hole and keep the end of the wool alongside the main thread.


Yo (working the end in) and ...


... ch 3. (I've now worked in the end which saves weaving it in later.)


2 tr (to finish the first cluster), ch 1 (to get to the second corner).


In the second corner work 3tr, ch2, 3tr. Ch 1 (to get to the third corner).


3 tr, 2 ch, 3 tr, ch 1 (third corner)
3 tr, 2 ch, 3 tr, ch 1 (fourth corner)


It needs one more treble cluster to finish the round.
3 tr, ch 2
On this final cluster I've worked over the loose end from the previous round. This helps to secure the end.


Join with a sl st to the first cluster and fasten off.


Just repeat these instructions with different colours until you have a square you are happy with. I work 5 rounds usually but you can make them whatever size you wish.


Here's the back of the small square. See the end I worked over?


Fasten it off by stitching over some threads 3 or 4 times, pulling it tight.


Hopefully you will not be able to see the fastening off.


There is a slightly different way of getting to a next round if you want to keep the same colour.

Work the first round until you reach the final corner. For this corner only ch 1.

Insert the hook at the top of the first cluster, yo and draw through.


There are now 2 stitches on your hook, yo and draw through 2.


Now work the next round. 
Yo and ch 3


And off you go round again chaining 1 across the sides of the square and chaining 2 at the corners.


Happy Grannying!


Please shout for any more help if you've been following the last few days and please tell me if I've planted the Granny seed in you!

Tuesday, 24 January 2012

Mum's Granny Along 4

For my Delightful Granny Students and anyone else who may be lurking - today's the day for your very first small square!

Lesson No. 4 - The Centre Square

Items needed - one ball of wool and a crochet hook.
Skill needed - to be able to chain, controlling the hook, the wool and the work confidently.

First of all here is some Crochet Speak

ch - chain
st - stitch
sl st - slip stitch
tr - treble
yo - yarn over
cl - cluster

This is where we left off at the end of Lesson 3.

Begin with a slip knot and ch 3.
Join with a sl st to form a ring.

Remember the 3 chain are a substitute for 1 treble. Two more trebles are needed to make our first cluster of trebles.

Put the yarn over (yo) the hook.


Put the hook through the Hole made by the ring and yo again.


Pull the yarn through the hole so now it looks like there are 3 stitches on the hook. Yo again.


Pull this loop through 2 stitches on the hook then yo again.


Pull this loop through the last 2 stitches on the hook. You have now crocheted your first treble (tr). Now it looks like you have 2 tr. One more is needed to make the first cluster. Work another treble.

Yo, hook through hole.


Yo and pull through hole.


Yo and pull through 2 stitches.


Yo and pull through 2 stitches.


The first cluster is now complete. Time for a corner.

Please note the smaller hook in the Hole.

Ch 2

First cluster and first corner

3 tr in hole
ch 2

2nd cluster and 2nd corner

Ch 2, 3 tr in hole, ch 2.

3rd cluster and 3rd corner
Ch 2, 3 tr in hole, ch 2.

4th cluster and 4th corner
Now to join the 4th corner to the first cluster.

Put the hook into the 3rd chain up (indicated by the needle). 


Try to have two strands of wool above the hook and one below.


Yo and pull through the chain and the loop on the hook. Snip off the wool.


Yo and pull through the loop to finish off.


You should end up with a small square - 4 clusters and 4 corners.


Did you? If you've managed all that you are probably raring to finish a full square. Youtube has many videos showing you how. If you just wish to plod along slowly following the way I make a square then the next lesson here will be crocheting a 2nd round in a different colour.


Monday, 23 January 2012

Mum's Granny Along 3

For my Delightful Granny Students here is:-

Easy peasy lemon squeezy Crochet Lesson No. 3

There's a different title today.

Lesson No. 3 - The Ring plus Pretend Treble

Items needed - one ball of wool and a crochet hook.
Skill needed - to be able to chain, controlling the hook, the wool and the work confidently.

Start with a loose slip stitch on the hook.


Now chain 3.


This next bit is tricky but important so think back to your last 2 lessons as to how the chain stitch looks. Slip the hook under the first V. There should be 2 strands of wool you can see on top of the hook and one strand (the bobbly bit) beneath.


Holding the first 2 chains wrap the wool around the hook as shown and pull a loop through the V.


Keep pulling through the loop already on your hook.


You have now 'slip stitched to form a ring'. There should be a hole in the middle. I've put another crochet hook through mine. This hole is important so make sure you know where it is.


Holding the 'ring', you are now going to chain 3. I work in the tail with the wool. You don't have to but it is one way of weaving it in.


Above is the work after chain 3 and I've used up all the tail. Below is the work without the tail woven in.


You could do a few of these starts in different colours while you wait for the next lesson.


Welcome New Followers. You may feel that crochet has taken over here but I see the sun shining outside. There will soon be other activities to pursue!