My Advent Calendar features a symbol on the first and last days and a letter on each of the other days. These letters and symbols are very easy to spot so there's no searching this year. The letters are all mixed up and on the 24th December they will need to be sorted to solve the message from me.
*
I made origami stars last year for my dancing friends and this year I thought I'd try some more Christmas themed paper folding. This time I chose to make Christmas trees and this 'card' is very easy and quick to make so batches can be made for a large number of people. They are not real cards but just a Christmassy token to relay festive greetings. My cards are destined for my co-workers at the CS and my dancing pals.
* First of all I gathered together the items needed for the project.
Sticky wickies!
And sheets of torn out pages from a Christmas mag.
* Each sheet was cut into a square - mine were 18cm.
* To make the tree, fold in half diagonally.
 |
| I've stuck a holly sticker in one corner to help show which way round I'm folding. (It may help.) |
* Open it out and fold 2 sides down to the crease.
* Turn it over and fold the other 2 sides down to the crease.
* Now fold the whole shape in half.
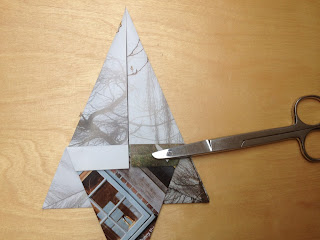
* Turn it over. See where I've placed the scissors?
* Fold the top bit down at this point.
* Fold up the little point at the bottom.
* Turn it over and there is the tree.
I used some glue …
… to stick down the springy bits.
What next? Why - make umpteen more of course and then decorate them.
I just signed the back with a Sharpie pen - no need to put who they are for as they are just a quick greeting for special groups of friends.
xx
PS You may find this version of instructions easier to follow.
I'm linking my Advent Calendar with Julie's Scrapbook.


Love those trees
ReplyDeleteJulie xxxxxx
What a great way to recycle a magazine.
ReplyDeleteOh these are delightful! I love the fact you are recycling too! I am also joining in with this Scavenger Hunt!!
ReplyDeletewhat a fab idea, thanks for sharing x
ReplyDelete